Guide to Scenic Fabrication Oversight

Chief Executive Officer
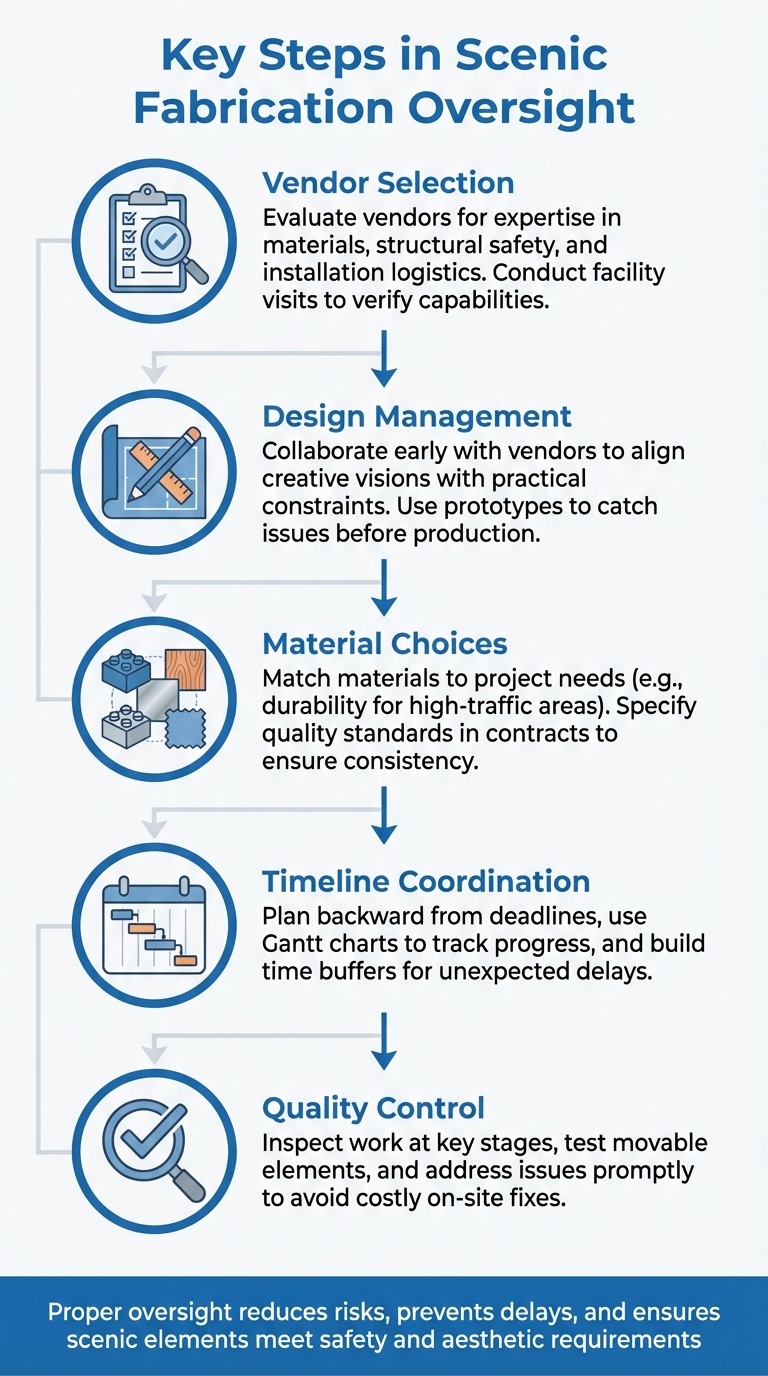
Scenic fabrication oversight ensures creative designs become functional, safe, and visually impactful elements for events. From vendor selection to quality control, this process balances artistry with technical precision to meet deadlines, budgets, and safety standards.
Key Steps in Scenic Fabrication Oversight:
- Vendor Selection: Evaluate vendors for expertise in materials, structural safety, and installation logistics. Conduct facility visits to verify capabilities.
- Design Management: Collaborate early with vendors to align creative visions with practical constraints. Use prototypes to catch issues before production.
- Material Choices: Match materials to project needs (e.g., durability for high-traffic areas). Specify quality standards in contracts to ensure consistency.
- Timeline Coordination: Plan backward from deadlines, use Gantt charts to track progress, and build time buffers for unexpected delays.
- Quality Control: Inspect work at key stages, test movable elements, and address issues promptly to avoid costly on-site fixes.
Why It Matters: Proper oversight reduces risks, prevents delays, and ensures scenic elements meet safety and aesthetic requirements. Whether it’s a trade show booth or a conference stage, a structured approach ensures flawless execution.
For event managers, this guide provides actionable strategies to navigate vendor management, design approvals, material selection, and risk mitigation effectively.
5 Key Steps in Scenic Fabrication Oversight Process
Choosing Scenic Fabrication Vendors
Setting Vendor Evaluation Criteria
Start by defining the main criteria for your project. A vendor with multidisciplinary expertise is crucial - they should have carpenters, metal workers, artists, engineers, and technicians all under one roof. This ensures they can handle everything from structural steel to scenic painting without relying on outsourcing. Review their technical drawings, structural calculations, and operational descriptions to confirm compliance with safety codes and regulations.
Material expertise is another key factor. Vendors who understand wood, plastic, steel, and fiberglass can recommend cost-effective alternatives through value engineering. If your project involves LED lighting, automation, or AV integration, make sure the vendor has experience coordinating these systems with structural elements. This ensures proper power distribution and heat management.
Also, consider the logistics of installation. Verify pathway dimensions, freight elevator capacities, and whether assembly will happen on-site or in the shop. For complex or people-carrying elements, ensure a Professional Engineer signs off to meet safety requirements. Vendors with strong prototyping capabilities can identify design issues early, helping to resolve bugs in interactive or mechanical elements before the final installation.
"How can you get set up for success when hiring a fabricator - and ensure a smoother process around the creation of your new museum, theme park attraction, exhibition, visitors center, and/or compelling brand experience? Begin with the end in mind - and work back from there." – Chicago Scenic Studios
Once you’ve outlined your criteria, validate a vendor’s qualifications through in-depth research and facility visits.
Researching Vendors and Visiting Facilities
A vendor’s portfolio can reveal whether their past projects align with your needs. The requirements for high-traffic museum exhibits, weather-resistant theme park attractions, and lightweight theatrical sets vary significantly. For example, Show Ready built a playable mini-golf course for Epic Games' Fortnite Summer Skirmish at PAX West 2018. This project included complex scenic elements like a pirate ship and desert oasis, designed with pre-rigged assemblies for quick load-in. Another example: For New York Comic Con in October 2022, they partnered with FG|PG to recreate the Daily Bugle and an NYC bodega for Marvel SNAP, featuring IP-accurate weathering and brick textures.
Facility visits are a must to confirm capabilities. Check whether the shop has tools like CNC routers, 3D printers, and vacuum formers. Look for a dedicated laboratory space that matches the services they offer. Ensure they maintain current Safety Data Sheets (SDS) and enforce proper use of Personal Protective Equipment. Inspect equipment maintenance logs to confirm tools are well-maintained and unlikely to fail during your project.
During your visit, observe shop testing of movable or automated elements to see if they operate smoothly and reliably at expected speeds. Ask about their process for updating work orders during fabrication and how they handle design changes. Check that materials are stored safely and that components are tracked throughout production.
Once you’ve verified their qualifications, the next step is ensuring their capabilities align with your event’s specific needs.
Matching Vendor Capabilities to Event Needs
Engage your fabrication partner early - ideally during the design phase. This collaboration allows for real-time budgeting and value engineering, preventing your design from exceeding budget constraints. With raw lumber prices still high post-pandemic, ask vendors how they’re navigating challenges like material shortages, increased shipping costs, and labor issues.
Match the vendor’s skills to your event’s demands. For high-traffic events, check if they select durable materials that can withstand constant touch and tight load-in schedules. For instance, Show Ready built "wave" walls for Falken Tires at SEMA. One wall was carved as a copper-canyon rock face, designed to handle heavy physical contact and high foot traffic. They also created a life-size Kratos & Atreus statue for Santa Monica Studio using carved foam with a bronze-like finish, showing their ability to replicate heavy materials with lightweight alternatives.
"Value engineering (or VE as most project managers call it) often works wonders, but there are drawbacks. For a start, it's time consuming and based on compromise - it typically involves giving up some of the things your team probably grew to love." – Chicago Scenic Studios
Make sure the vendor can create pre-rigged assemblies for tight installation timelines, with clearly labeled hardware for a smooth load-in. For projects in maintenance-heavy environments, confirm they prioritize designs that reduce long-term upkeep and downtime.
At Corporate Optics (https://corporateoptics.com), we stress the importance of early collaboration with trusted fabrication partners. By following these steps, you can ensure every detail of your event aligns with your specific goals and expectations.
sbb-itb-ae35a94
Design Approval and Collaboration Processes
Managing Design Submissions and Approvals
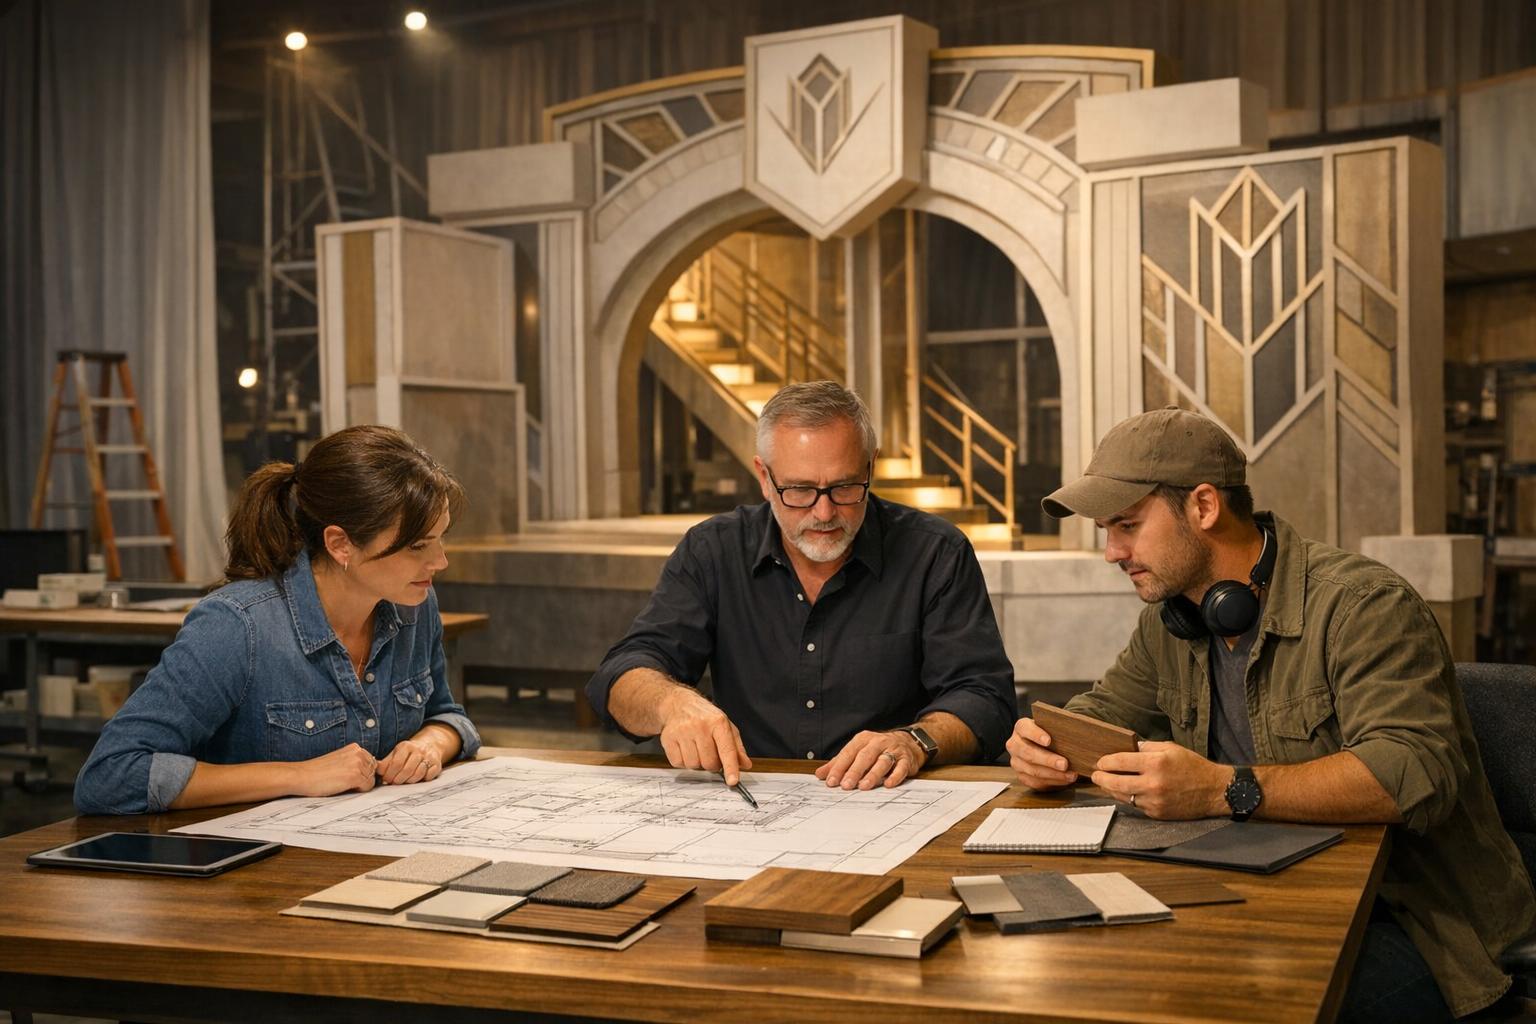
Once you've assessed leading event production providers, the next step is to kick off the design approval process. Start with concept development - sketches or digital renderings are great tools to align the creative vision with practical requirements. After the initial concept gets the green light, fabricators can move forward with detailed CAD specifications, structural calculations, and material schedules. These serve as the foundation for construction.
Before finalizing technical drawings, bring together your multidisciplinary team - this includes AV developers, electricians, and engineers. Early collaboration ensures all systems are integrated into the design, avoiding costly retrofits down the line. Another critical step is to think ahead to installation day. Double-check the physical constraints of your venue, like the dimensions of freight elevators, dock doors, and pathways. These details matter because they determine whether the fabricated pieces can actually be delivered and installed without a hitch.
For installations that will be open to the public, safety is non-negotiable. Make sure designs and technical drawings are reviewed and approved by professional engineers. If your project involves complex or moving parts, request written descriptions or 3D simulations to confirm the design meets both safety and functional requirements. A good example of this process in action is the collaboration between Show Ready and FG|PG for New York Comic Con in October 2022. Together, they recreated the Marvel multiverse, locking in a "look-book" of finishes - like brick textures and weathering effects - and a sequencing plan that ensured everything from the Daily Bugle to Oscorp sets met IP standards before fabrication began.
Working Through Design Revisions
Revisions are part of the process, but managing them effectively requires clear communication and realistic expectations. When designs exceed budget, Value Engineering (VE) is often the go-to solution. This involves revisiting material choices to bring costs back in line. However, VE isn’t without its challenges.
"Value engineering (or VE as most project managers call it) often works wonders, but there are drawbacks. For a start, it's time consuming and based on compromise - it typically involves giving up some of the things your team probably grew to love." – Chicago Scenic
Cost savings can often be achieved through material substitutions. For example, scenic painting can mimic real wood, and printed textured vinyl graphics can replace pricier flooring options. In high-traffic areas, particularly those frequented by children, it’s smart to choose more durable materials from the outset. While upfront costs might be higher, they often save you from frequent repairs and downtime in the long run.
Post-pandemic challenges, like material and labor shortages, mean timelines are longer than they used to be. What once took three months might now require significantly more lead time. To stay on track, lock in finishes early by creating an approved "look-book" of textures during the concept phase. This not only streamlines fabrication but also ensures consistency. Another tip: involve fabricators in design meetings as early as possible. Their input on materials and construction methods can help you avoid falling in love with concepts that are impractical or out of budget.
Using Prototypes and Mockups for Testing
Prototypes are your last line of defense against costly mistakes. They allow you to identify design flaws before moving into full-scale production. Structural components are load-tested during this phase to ensure they can handle public interaction safely. Similarly, mechanical and automated elements are tested through their full range of motion to confirm reliability and avoid delays during installation.
"A full-scale mock-up or replica may be the best alternative to provide a true sense of scale early in the process and to avoid surprises at the end." – Chicago Scenic
Interactive elements, in particular, require thorough testing. Allocate enough time and budget for prototypes to work out any bugs and ensure they can handle heavy use. Prototypes also help verify compatibility with other components and allow you to evaluate finishes for both durability and appearance before committing to large-scale production.
Full-scale mock-ups are invaluable for catching design flaws early. They provide a true sense of scale and help you avoid expensive surprises later on. Once the designs are refined and prototypes validated, the focus shifts to selecting materials that align with both quality standards and budget constraints.
Material Selection and Quality Requirements
Comparing Material Options and Costs
Choosing the right materials shapes both the look and cost of a project. It's essential to align materials with their intended environment and expected use. For instance, indoor theater sets often use lightweight woods like pine or poplar for structural framing, while outdoor setups demand more durable materials like aluminum or fiberglass to handle weather exposure. Aluminum, with its impressive strength-to-weight ratio, is a favorite for touring productions or venues with limited accessibility.
Striking the right balance between aesthetics, structural integrity, and budget is key. Take the Falken project at SEMA as an example: Show Ready crafted "wave" walls, one designed to mimic a copper-canyon rock face and another inspired by the sleek lines of a performance car. These pieces were built to withstand constant interaction and the hustle and bustle of a busy show floor. Similarly, at the Nix Nature Center in Laguna Coast Wilderness Park, scenic textures and paint finishes were selected to encourage hands-on learning while holding up to daily visitor traffic.
Budget-friendly alternatives can also deliver high-end looks without breaking the bank. Foam sculpting paired with advanced paint techniques can replicate materials like bronze or stone, as seen in the Kratos & Atreus statue for Santa Monica Studio. MDF and plywood are often used as an affordable and smooth base for painted finishes, while fiberglass excels in creating lightweight, intricate shapes that are both durable and visually striking.
Here’s a quick breakdown of commonly used materials, their ideal applications, and key benefits:
| Material | Best Use Case | Key Benefits |
|---|---|---|
| Carbon Steel | Load-bearing structural applications | High strength; requires anti-corrosion treatment |
| Aluminum | Touring sets; humid environments | Lightweight and resistant to corrosion |
| Fiberglass | Outdoor theme parks; organic shapes | Durable in weather; allows detailed textures |
| MDF / Plywood | Painted surfaces | Affordable with a smooth finish |
| Foam | Sculptural elements (e.g., rockwork) | Lightweight and easy to shape |
Once you’ve identified the right materials, it’s crucial to include quality requirements in contracts to maintain standards.
Specifying Quality Standards in Contracts
Material selection is just the first step; contracts must clearly outline quality expectations. This includes precise technical specifications and traceability requirements. Vendors should provide certifications for the material’s origin and verify its properties through testing, whether chemical or physical.
For critical components, traceability is essential. Require lot or batch numbers to track materials, and implement Mandatory Control Points (MCPs) - key stages where inspections must occur - to catch any issues early. Providing vendors with sample inspection forms and specifying preferred data formats can ensure consistency in quality reporting.
"The purpose of a vendor contract is to allow all parties involved to understand what is expected in terms of deliverables, payment, etc. during an exchange of goods or services and the consequences if those expectations are not met." – Ironclad
Final payments should only be made once a complete End Item Data Package is delivered. This package should include certificates of compliance, inspection records, and as-built drawings. Additionally, there should be clear procedures in place for handling non-conforming materials, whether through rework, repair, return, or scrapping, to prevent last-minute problems.
Managing Design and Budget Trade-offs
Once materials meet quality standards, the next challenge is balancing creative goals with financial constraints. Using economical options like pine or poplar for structural framing can help control costs, while reserving premium woods like oak or maple for high-visibility millwork ensures an impactful finish where it matters most.
"Material properties directly impact manufacturing costs and lead times: Machinability, formability, and thermal processing requirements can increase production time by 300% or more when not properly considered." – Modus Advanced
Defining material requirements early is critical to avoiding costly delays. For high-traffic areas, finishes should be durable enough to handle frequent interaction while maintaining their visual appeal. Involving fabrication teams during the design phase can help evaluate material feasibility and budget implications, reducing the risk of expensive mid-project changes. For example, during the Marvel SNAP collaboration at New York Comic Con, a pre-approved look-book of finishes - including weathered graphics, brick textures, and wheatpasted posters - ensured the design aligned with intellectual property guidelines and fan expectations, all while staying on budget. This highlights how early material decisions can prevent costly adjustments down the line.
Managing Timelines and Project Milestones
Creating Realistic Project Schedules
Managing project timelines is just as important as vendor assessments and event production planning. A well-structured timeline ensures the fabrication process stays on track. One effective way to organize this is by using a Work Breakdown Structure (WBS), which divides the project into smaller, manageable phases - like structural assembly, finishing, painting, and installation. Each phase should have specific deadlines that account for task dependencies. For example, finishing work can’t start until structural assembly is done. Recognizing these dependencies helps you map out the critical path, which is the sequence of tasks that determines the shortest time required to complete the project.
A smart approach is to plan backward from the final deadline - whether it’s the installation or load-in date. By starting with the end goal and working in reverse, you can address time constraints early on and avoid last-minute surprises. Set clear milestones, such as "Design Approval", "Paint Ready", or "Load-in Start", to mark transitions between phases and keep the project moving forward.
"A solid project plan is more than just a timeline - it's a blueprint for success." – Adobe for Business Team
It’s tempting to rely on optimistic estimates, but that’s a common pitfall. Instead, involve the people doing the actual work - like welders, painters, and riggers - to get realistic timeframes. Historical data from similar projects can also ground your estimates in reality. Tools like Gantt charts are especially helpful for scenic fabrication projects. They visually lay out sequential and overlapping tasks, making it easier to spot where delays could ripple through the schedule.
Once you’ve created the schedule, the next step is monitoring progress and staying alert to potential delays.
Monitoring Progress and Critical Path Items
After setting a realistic timeline, consistent monitoring is essential to keep the project on track. Gantt charts are particularly useful here, as they clearly show task dependencies. If a critical task falls behind, the chart makes it obvious how this will impact the rest of the schedule. For high-stakes projects with tight deadlines - like the Fortnite Summer Skirmish at PAX West, which featured an $8,000,000 prize pool - there’s no room for unexpected delays. Real-time dashboards can provide instant updates, eliminating the need for manual status reports.
Regular check-ins with the team are vital. Weekly or bi-weekly meetings create opportunities to address roadblocks before they escalate into major issues. These meetings should focus on critical tasks that directly affect the overall timeline. Metrics like task completion rates and adherence to deadlines can help identify bottlenecks early. Breaking large scenic builds into smaller, more manageable work packages can also improve accuracy in time estimation and make it easier to detect potential problems.
"When everyone is aware of the deadlines and their role in meeting them, it fosters a culture of responsibility and ownership." – Project Manager Coach
Centralized tracking tools like Jira, Asana, or Trello can keep everyone on the same page. These platforms give all stakeholders real-time visibility into the project’s status, reducing miscommunication about what’s done and what still needs attention. They also help ensure that key team members aren’t overburdened during critical phases of the project.
Planning for Delays and Setbacks
Even with the best planning, unexpected challenges are inevitable. Building time buffers into your schedule can help absorb delays caused by issues like material shortages, equipment breakdowns, or shipping problems. For specialty materials, include procurement lead times in your planning to avoid pauses in fabrication.
Another way to minimize risk is in-shop testing. For example, at the Falken Tires booth for SEMA, Show Ready fabricated intricate "wave" walls and tested them thoroughly in their shop before shipping. SEMA is known for its tight load-in windows, and this advance testing ensured the structures could be installed quickly without requiring on-site fixes.
"This phase [testing] identifies any issues that can be resolved in the controlled environment of the shop, preventing costly delays during on-site installation." – Show Ready
It’s also important to have a formal change management process in place to handle shifts in scope or schedule. Any design changes or additional requirements should be carefully reviewed for their impact on the timeline before approval. Additionally, setting aside contingency funds can cover unexpected costs, like expedited shipping or switching to backup suppliers during critical moments. Diversifying your supplier base reduces reliance on a single vendor, and scenario planning - such as preparing for weather delays or supply chain disruptions - can help you respond quickly without scrambling for solutions.
Quality Control and Final Inspections
Inspecting Work at Key Fabrication Stages
Quality control isn't something you save for the end of a project - it needs to happen at every step of the fabrication process. Before any work begins, start with an inspection of the vendor's facility. Check their equipment, cleanliness, and adherence to lab standards. This on-site visit can reveal a lot about whether the vendor is genuinely prepared to meet your expectations - something you can't always gauge from their written reports.
Once fabrication is underway, in-process data collection becomes essential. Instead of waiting until the entire scenic element is finished, verify progress as it's being made. This proactive approach helps catch mistakes early when they’re easier (and cheaper) to fix. To stay on top of things, schedule regular milestone check-ins - weekly or bi-weekly meetings work well. These sessions should focus on measurable progress and specific deliverables, avoiding vague assessments.
"A critical mistake by a vendor hurts your project. So it's important to set and keep standards." – Tom Reid, Subcontract Management Institute
For complex or high-stakes scenic builds, in-person inspections are invaluable. Remote updates can only tell you so much. Physically inspect key stages of fabrication, such as structural assembly, finishing work, and designing AV production for the build. This hands-on review ensures the vendor is following safety and quality protocols. During these visits, record your observations systematically - this documentation helps you address any issues immediately and keeps the project on track.
Recording Inspection Findings and Fixing Problems
Turning inspections into actionable results requires thorough documentation. Use standardized evaluation templates that include sections for observations, corrective actions, and scoring. If you spot a problem, document it right away with detailed notes and photos. This creates a clear record of what needs to be addressed.
A Vendor Change Order Log can help you track any modifications or fixes required during fabrication. This log ensures that any deviations from the original specifications are formally documented and approved before moving forward. It also protects your timeline and budget by creating a clear paper trail for any cost or schedule changes caused by quality issues.
Speed is critical when addressing problems. Notify vendors of quality concerns as soon as you identify them - don’t wait for the next scheduled meeting. This immediate feedback allows for real-time corrections and prevents flawed work from progressing further. To ensure smooth communication, request that vendors assign a dedicated account manager for quality control. Having one go-to contact streamlines the process and keeps everyone accountable.
In addition, use trigger metrics to flag when unscheduled performance evaluations are needed. For example, if welds fail to meet specifications or paint finishes show inconsistencies, these triggers should prompt an immediate inspection and corrective action plan. The goal is to resolve issues while the scenic elements are still in the shop, where fixes are faster and less disruptive than addressing them on-site.
Performing Final Checks Before Installation
After resolving in-process issues, final inspections confirm everything is ready for installation. These checks ensure all elements meet the agreed-upon guidelines and contract specifications. For movable scenic elements, test their full range of motion at anticipated operational speeds. Perform these tests both in the shop and again during the fit-up at the venue.
"All movable elements should be tested in their normal range of motion at their anticipated speed of operation... These tests should be conducted in the shop (if applicable), upon fit-up and before each rehearsal and performance." – Ontario Ministry of Labour
For flown elements, weight and balance verification is critical. Check the total mass, including counterweights, to ensure smooth and safe operation during acceleration and deceleration. For deck-supported elements, confirm stability and even weight distribution. If the scenic pieces are designed to carry performers, test them using a weight facsimile - a structure that mimics the weight and center of gravity of the performer - before giving final approval.
Fire safety is another key consideration. Verify that all scenery and drapery are made from fire-resistant materials or have been treated with flame retardants. Emergency stop mechanisms must be clearly marked, functional, and easily accessible to operators. Installation should only proceed once all criteria have been met and checklists are signed off. This "closed loop" process ensures nothing gets overlooked.
Lastly, assess logistical readiness. Can the scenic elements be safely transported, assembled, and dismantled by your crew? Addressing these practical concerns during the final inspection helps prevent delays and potential safety issues at the venue. Remember, quality is about meeting the exact expectations outlined in your contract - not going above or falling short.
Communication and Vendor Relationships
Setting Up Communication Protocols
Good communication is the backbone of any successful project, and it should start long before fabrication begins. Reach out to your fabricator early with a general concept - this allows you to identify and correct potential mistakes before they turn into costly issues. When you meet, come prepared with detailed diagrams and clear explanations for each scenic element. A simple rule of thumb: spend twice as much time preparing as the meeting itself will take.
Whenever possible, rely on written documentation rather than verbal discussions. Fully defined drawings are far more reliable than conversations, which are prone to misinterpretation or being forgotten. Schedule regular check-ins - weekly or bi-weekly meetings are often ideal - and use digital project management tools to keep everyone updated in real time. Before the event, bring your entire team together, including top production companies, for a final briefing. This meeting should reinforce roles, expectations, and communication protocols, ensuring everyone is on the same page. Taking these steps paves the way for ongoing collaboration and builds a solid foundation for long-term partnerships. This collaborative approach is a cornerstone of the scenic fabrication process.
Giving Feedback and Acknowledging Good Work
Think of fabricators as an extension of your team rather than just external vendors. This mindset promotes shared responsibility and helps establish trust, which is essential for creating multi-year partnerships. Open, responsive communication is key - everyone should understand how their roles connect to the bigger picture, especially when it comes to delivering seamless event execution.
When challenges arise, address them immediately with constructive, specific feedback. At the same time, don’t overlook the importance of recognizing and celebrating excellent work. Relationships built on mutual creativity and respect can lead to projects that push boundaries, something a purely transactional approach often fails to achieve. For instance, in September 2025, Studio Tech played a critical role in the One805LIVE! benefit concert at Kevin Costner's estate in Summerland, California. Acting as an integral part of the production team for the third consecutive year, they delivered essential network services for media, talent, and live audiences, showcasing the value of close collaboration.
Building Long-Term Vendor Partnerships
Strong communication lays the groundwork for long-term partnerships, which can simplify future projects and improve teamwork. Involve fabricators early in the planning and brainstorming stages of upcoming events to tap into their expertise in materials and construction methods. Be upfront about your goals, budgets, and expected purchasing volumes - this transparency helps fabricators allocate resources more effectively.
Financial reliability is a critical factor in maintaining these partnerships. Timely payments not only build mutual respect but can also secure priority service. Consider creating preferred vendor lists or entering exclusivity agreements to encourage fabricators to offer better pricing and prioritize your projects. A great example of this approach is the December 2025 announcement of a major production partnership between Autumn Bailey Entertainment, Braveheart Entertainment, and Assembly Studios in Atlanta. Dan Biersdorf, VP of Universal Production Services, highlighted the collaboration's impact:
"Autumn Bailey Entertainment and Ty Walker's Braveheart Entertainment partnership with Assembly leverages the Southeast's most advanced production ecosystem... Together, we're building opportunity, amplifying new voices, and redefining what TV and filmmaking can achieve in the South".
As NAKS, Inc. aptly puts it:
"Loyalty to your suppliers can lead to preferential treatment, such as priority production slots, access to new product lines, or more flexible payment terms".
Planning for Problems and Reducing Risks
Identifying Common Fabrication Risks
Scenic fabrication projects come with a variety of risks that can disrupt timelines, inflate budgets, or compromise safety. Physical risks are a primary concern, including injuries like cuts from sharp tools, crushing accidents involving machinery, or punctures from handling metal sheets. On top of that, there are health and environmental risks - long-term exposure to wood dust has been linked to conditions like asthma and cancer, while welding fumes and chemical finishes can harm the respiratory system and skin.
The risks don’t stop at worker safety. Structural and operational risks can jeopardize the entire event. These include the failure of flown elements, instability in deck-supported scenery, or breakdowns in automated systems. Logistical challenges also loom large: tight load-in schedules, the need for durable materials in high-traffic areas, and weatherproofing for outdoor setups can all create headaches. Supply chain disruptions are another major hurdle - over 75% of manufacturers have faced delays, with lead times increasing by as much as 30%.
Tackling these issues starts with a thorough risk assessment. This means analyzing tools, materials (for toxicity or flammability), and the work environment (like lighting and ventilation). A Job Safety Analysis (JSA) can break tasks into smaller steps to identify where accidents are most likely. For more complex projects, tools like Failure Modes and Effects Analysis (FMEA) can help predict potential issues - whether it’s a tool malfunction or a material reacting poorly to heat. During the design phase, reviewing CAD specifications and structural calculations can catch engineering challenges before they escalate. Addressing risks early ensures a safer and smoother fabrication process.
Creating Risk Response Plans
Once risks are identified, the next step is to create targeted response plans. Chicago Scenic highlights the value of involving a fabrication partner early on to minimize last-minute adjustments and reduce the need for Value Engineering. A solid approach involves five steps: pinpoint vulnerabilities, assess their potential impact, plan mitigation strategies, monitor developments, and establish oversight protocols.
One key strategy is to diversify suppliers, avoiding reliance on a single source for critical materials. Given that 41% of manufacturers cite supply chain disruptions as a major concern, maintaining relationships with multiple vendors is essential. Building inventory buffers of crucial materials can also help keep projects on track during unexpected spikes in demand or supplier delays. For intricate designs, full-scale mock-ups and prototypes are invaluable for testing durability and resolving technical challenges before production begins.
A great example of risk management in action comes from Show Ready’s work on “wave” walls for Falken Tires at the SEMA trade show. To achieve the desired look - copper-canyon rock faces and a car “bursting” through the surface - they pre-tested carving and finishing techniques to ensure the installation could handle constant interaction and tight load-in schedules without compromising the visual impact.
Other proactive measures include cross-training staff to mitigate the effects of absenteeism and using predictive maintenance to reduce equipment downtime by up to 30%. Running tabletop exercises - simulated risk scenarios - helps teams refine their response strategies and uncover weaknesses in current plans. Additionally, sharing jobsite details early, like freight elevator dimensions or noise restrictions, ensures smoother on-site assembly. These steps collectively set the stage for a well-executed event.
Preparing for Event-Day Issues
With risk plans in place, the focus shifts to managing challenges on event day. Start by establishing a clear chain of command for routine operations and emergencies, and make sure everyone involved - crew and performers alike - understands it. Before each rehearsal or performance, test all movable scenic elements at full speed and range to catch mechanical issues ahead of time.
Emergency preparedness is equally important. Ensure exits remain unobstructed, and verify that emergency equipment is fully operational. For movable elements meant to stay static during a show, use hardware locks, safety chains, or disconnect power to prevent accidental movement. Clearly mark E-stop mechanisms for easy access by operators, and use spotters in areas with limited visibility to maintain clear communication.
Educate performers and non-operating crew on what to do if a scenic element fails or an emergency occurs. For scenic elements that support people, daily testing with a weight equivalent to the performer’s ensures ongoing safety.
Keep work areas organized to avoid trips, falls, or fire hazards. Properly store tools when not in use, and maintain at least 36 inches of clearance around electrical equipment and 18 inches below sprinkler heads to ensure fire suppression systems are effective. Keep safety plans, like Fall Protection Plans and Safety Data Sheets (SDS), readily accessible on-site for quick reference during installation and the event. These measures help ensure smooth operations and a safe environment for everyone involved.
Event A/V Essentials Part 2: Transform Your Space with Scenic Design (Stage, Lights and More!)
Conclusion
Effective scenic fabrication oversight hinges on early collaboration. Involving fabrication partners during the design phase helps avoid costly compromises later on. As Chicago Scenic aptly notes:
"One of the most common early issue is around the budget - and whether the design they have come to love will greatly exceed their budget".
This forward-thinking approach not only saves time and money but also helps preserve creative integrity.
Beyond collaboration, a well-defined strategy covering design, installation, and quality control is essential. Installation-first thinking ensures that practical considerations like ceiling heights, freight elevator dimensions, and dock access are addressed before fabrication begins. After all, a 16-foot set won’t work in a space with 11-foot ceilings. A thoughtful material strategy also plays a key role, balancing aesthetics with durability - especially for high-traffic areas where scratch-resistant surfaces are a must. Additionally, quality control through prototypes and mock-ups helps identify potential issues before they escalate into costly on-site problems.
Strong communication and dependable vendor relationships are equally critical. Clear roles, consistent progress checks, and open feedback loops keep projects running smoothly. Long-term vendor partnerships bring added value, offering access to experienced professionals who can suggest creative, budget-friendly solutions and navigate technical challenges.
Risk management safeguards your project by addressing potential issues like supplier delays, safety concerns, and last-minute changes. This includes working with multiple suppliers, conducting safety checks during fabrication, and having contingency plans in place for event day.
At Corporate Optics (https://corporateoptics.com), we apply these principles to create scenic elements that are as functional as they are visually impactful.
FAQs
What should I look for when choosing a scenic fabrication vendor?
When choosing a scenic fabrication vendor, it’s crucial to find a team that blends creativity, technical expertise, and dependability. Start by evaluating their experience with projects similar to yours and reviewing a portfolio that demonstrates their capabilities. Make sure they can handle the specific materials your project requires - whether it’s wood, metal, or composites - and have the engineering know-how to deliver durable, well-crafted set pieces.
It’s equally important to confirm that the vendor adheres to safety standards, such as OSHA regulations and fire codes, and has a defined quality assurance process to maintain high standards. Effective project management and clear communication are also key, especially when dealing with tight schedules, design approvals, or unexpected changes. Vendors who can adapt to your project’s unique demands and scale their services as needed are better equipped to handle complex requirements.
Corporate Optics exemplifies these traits, offering end-to-end scenic production services, material expertise, and a robust QA process to ensure your project is executed flawlessly.
Why are prototypes and mockups important in scenic fabrication?
Prototypes and mockups play a key role in scenic fabrication because they give you the chance to test and tweak designs before diving into full-scale production. By examining aspects like dimensions, materials, and functionality early on, you can spot and fix potential problems, steering clear of expensive mistakes later.
This hands-on testing approach minimizes material waste, keeps delays at bay, and ensures the final product aligns with both the visual and practical goals. Spending time on prototypes upfront not only saves money but also makes the entire production process much more seamless.
How can I effectively manage timelines for scenic fabrication projects?
Managing timelines for scenic fabrication calls for a well-structured, milestone-focused approach that divides the project into clear phases - like design approval, material procurement, fabrication, and installation. The first step? Create a detailed schedule that lists all critical tasks, assigns responsibilities, and sets firm deadlines. A master checklist can also be a lifesaver, helping you keep track of deliverables, avoid scope creep, and ensure everyone on the team stays accountable.
Weekly progress reviews or quality-control meetings are another must. These regular check-ins allow you to spot potential delays early and adjust resources to stay on track. It’s also smart to build in a contingency buffer of about 5–10% into your timeline. This extra time can help you handle unexpected hiccups, like material shortages or last-minute design tweaks, without derailing the entire project.
Corporate Optics makes managing all this easier by offering a centralized project-management platform. It streamlines everything from design approvals to vendor communication and provides real-time updates. With everyone - designers, fabricators, and on-site teams - on the same page, you can minimize surprises and keep the project moving smoothly.
Related Blog Posts


Streamline your workflow, achieve more

Lorem ipsum dolor sit amet, consectetur adipiscing elit. Maecenas ac velit pellentesque, feugiat justo sed, aliquet felis.

Lorem ipsum dolor sit amet, consectetur adipiscing elit. Maecenas ac velit pellentesque, feugiat justo sed, aliquet felis.