LED Wall vs. Projection For Corporate General Sessions: How To Choose

Chief Executive Officer
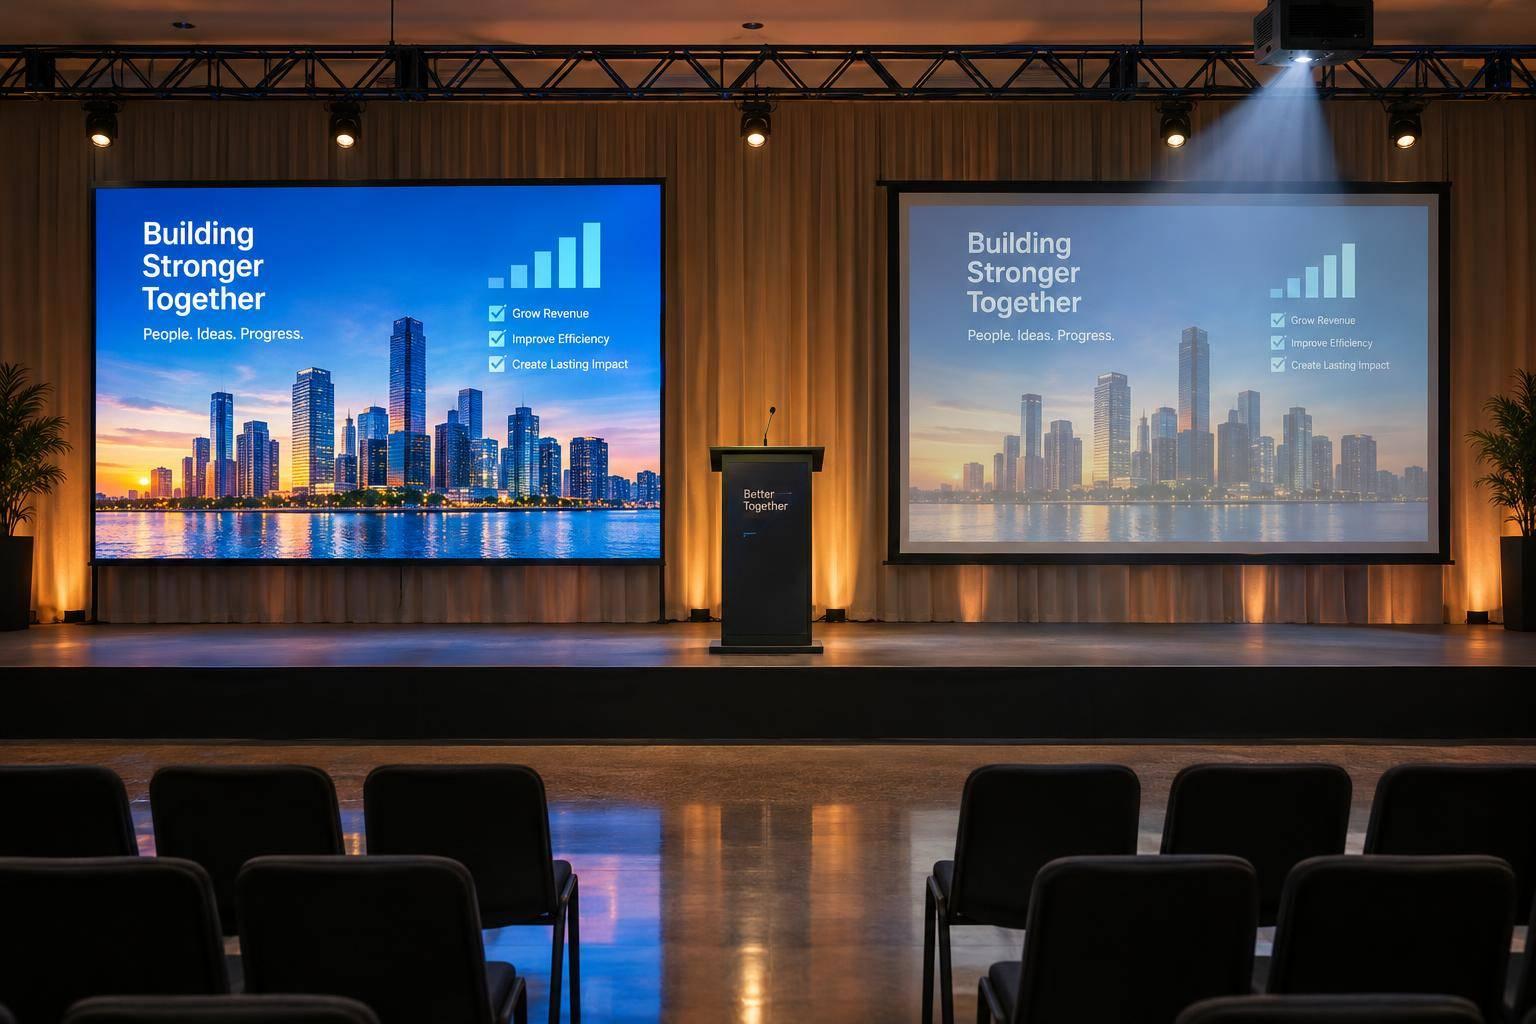
I’d favor LED for a brightly lit ballroom and projection for a dark room with enough throw distance. Before booking either, I’d test your actual slides from the back and side seats - not just judge the image from the stage.
My decision comes down to three checks:
- Image quality: Can guests read text and see video and live camera feeds under show lighting? Check viewing angles, presenter shadows, and camera results, too.
- Venue fit: Will the display work with your stage layout, power, support structure, load-in access, and setup schedule?
- Total cost: Compare equipment, labor, delivery, rigging, processing, light control, rehearsal, and backups - not rental prices alone.
For LED, P2.6 at about 8.5 feet and P3.9 at about 12.8 feet are starting points for viewing-distance checks, not guarantees of readable slides.
Quick Comparison
| Check | LED wall | Projection |
|---|---|---|
| Room lighting | Usually holds contrast better with lights on | Works best with controlled light |
| Text and viewing | Check pixel pitch, resolution, and side seats | Check image size, focus, and screen material |
| Video and cameras | Test camera artifacts and presenter exposure | Test exposure, contrast, and flicker |
| Stage space | Needs approved support and service access | Needs throw distance and clear beam paths; rear projection needs backstage space |
| Installation | Verify power, loads, access, and setup time | Verify mounting, ventilation, alignment, and light control |
| Budget and backup | Price the installed system and spare parts | Price the installed system, light control, and backup equipment |
My rule: <u>fund readability before scenic extras</u>. I’d approve either system only after a venue review and an actual-content test from the seats with the poorest view.

LED Wall vs. Projection: Corporate Event Decision Guide
LED Wall vs. Projector: What’s Best in 2026?
sbb-itb-ae35a94
LED Wall vs. Projection: Image Quality
Compare the full image chain - not just the display.
| Factor | LED wall | Projection |
|---|---|---|
| Ambient-light performance | Usually keeps stronger brightness and contrast in a lit ballroom, especially with windows or house lights. | More affected by daylight, stage-light spill, and house-light levels. |
| Contrast | Direct control of each pixel helps produce strong perceived contrast. Results still depend on panel quality, calibration, and brightness settings. | Depends heavily on projector contrast, screen gain, room darkness, and stray light. |
| Text readability | Fine-pitch LED displays small text and detailed graphics clearly at suitable viewing distances. | Can deliver highly readable text when the image is large, focused, properly aligned, and the room is dark enough. |
| Video playback | Works well for saturated colors, motion graphics, branded backgrounds, and high-impact scenic looks. | Also works well, especially with a high-quality projector and screen in a dark room. Black levels and color saturation may drop as ambient light increases. |
| Viewing angles | Generally supports broad audience viewing angles, though brightness and color can change with panel design and off-axis position. | Depends on screen material. Some high-gain screens boost brightness but narrow the usable viewing cone or create hotspots. |
| Presenter shadows | No projection beam crosses the presenter, so presenters normally don't cast shadows onto the image. | Front projection can cast presenter shadows, making careful positioning important. Rear projection avoids front-beam shadows but needs space behind the screen. |
| Camera suitability | Can work well for IMAG and livestreams when refresh rate, shutter behavior, scan settings, pixel pitch, and camera angle are tested. A refresh rate of 3,840 Hz or higher is commonly recommended for broadcast-oriented use. | Can work on camera, but projected-image exposure, contrast, focus, flicker, and shutter synchronization need testing - not assumptions. |
Start with the room: lighting is the first test of readability.
Room Lighting and Slide Readability
Check daylight control and stage-light spill. Specify native resolution, lens, screen gain, and screen surface together rather than choosing by brightness alone. More projector lumens won't restore black levels lost to ambient light. If exposed windows can't be covered reliably, require an on-site lighting test before approving projection.
For LED, confirm pixel pitch and total pixel dimensions. A larger wall doesn't guarantee readable charts. With either system, enlarge key labels, use strong contrast between text and backgrounds, and avoid thin chart lines. Test font sizes with the actual deck from the farthest seat.
Viewing Distance and Audience Sightlines
Record the nearest, farthest, and outermost side seats, along with display height and any obstructions. Use P2.6 as a planning baseline at around 8.5 feet and P3.9 at around 12.8 feet, then check those choices against actual audience and camera positions.
Size projected images for the farthest seat, then check both side sections. Keep front-projection beams clear of presenter positions. Before choosing rear projection, confirm there's enough backstage depth.
Once sightlines are clear, test the actual content mix on the chosen display.
Slides, Video, and Live Camera Feeds
During technical rehearsal, check image quality both on stage and on camera. Show the actual deck, videos, lower-thirds, and live camera magnification (IMAG) feed using the planned cameras and lenses. Verify aspect ratio, scaling, playback frame rate, color handling, and fine-detail reproduction.
For LED, a refresh rate of 3,840 Hz or higher is commonly recommended for broadcast-oriented use, but refresh rate alone doesn't prevent moiré or scan artifacts. Test shutter settings, camera angles, and wall brightness against presenter exposure.
For projection, test contrast, exposure, and flicker. Don't assume the audience view will match the livestream.
Venue and Installation Requirements
Require a documented venue review before choosing either display. Record rigging or floor capacity, electrical service, loading access, and setup and strike windows. Get written confirmation from the venue and production team. Rule out any option that cannot be installed safely and on schedule.
Once you confirm that the room can support the display, check the layout for readability and clear sightlines.
| Installation requirement | LED wall | Projection |
|---|---|---|
| Support and space | Document footprint, ballast, floor load, or approved flown load, plus access for panel service. | Confirm projector mounting, screen support and placement, and rear-screen clearance where needed. |
| Power and ventilation | Request typical and maximum electrical loads, power distribution, and ventilation clearances. | Confirm projector power, heat output, ventilation, and maintenance access. |
| Processing and signal | Specify processors, receiving cards, source resolutions, output mapping, and data routes. | Specify signal routes, scaling, and blending and alignment needs. |
| Service clearance | Allow space for support depth, not just the visible image. | Document lens throw range, clear beam paths, and blackout or dimming measures. |
Room Size and Stage Layout
Include ceiling height, stage depth, display dimensions, seating, presenter paths, and cameras on one layout drawing. Size the image for the farthest seat while keeping text readable and camera sightlines clear. Ground-supported LED may need approximately 4–8 feet of rear clearance, depending on the system.
For a wide or segmented stage, compare a continuous LED canvas with separate center and side surfaces. Confirm processor outputs for each. Multiple projected surfaces may require additional projectors, matched lenses, edge blending, and time for alignment.
Match lens throw to screen width before locking in screen size. Once the layout is set, verify power, rigging, and access before making the final display choice.
Power, Rigging, and Load-In
Request a system-specific load schedule, not a generic display allowance. LED calculations should include cabinets, support hardware, cabling, and motors or ballast. For projection, check the lens, mounting, screen, cable routes, and access for focus and alignment.
Verify venue rigging approvals, permitted electrical connections, union labor, fire lanes, dock reservations, and freight-elevator dimensions. Assign separate time windows and task owners for delivery, assembly, calibration, rehearsal, and strike.
Rehearsals and Backup Plans
Test slides, video, IMAG, lighting cues, transitions, and presenter movement using the final playback systems. Check views from front, rear, side, accessible, and highest-angle seats. Leave time for corrections before doors open.
Specify a second playback source, a spare signal path, replacement LED modules or critical cables, and processor or switcher redundancy where appropriate. Assign a troubleshooting lead and rehearse the switch to the backup system.
Use the test results to compare labor, processing, and backup requirements against total production cost.
Compare Total Production Costs
Once you’ve defined the room, content, and audience requirements, price the full installed system - not just the display. Request itemized estimates in U.S. dollars ($), labeled as illustrative. Actual totals vary by market, room, display size, pixel pitch, labor rules, venue policies, and program complexity.
| Cost category | LED wall estimate should include | Projection estimate should include |
|---|---|---|
| Equipment | Panels at the specified pixel pitch, cabling, receiving cards, and spare tiles | Projectors, screens, mounts, and backup equipment |
| Delivery | Freight, cases, handling, and pickup | Freight, cases, handling, and pickup |
| Labor | Assembly, calibration, show operation, and strike | Setup, alignment, show operation, strike, and sightline protection |
| Rigging | Approved flown or ground-support structure | Screen supports, projector lifts, or rigging points |
| Power | Electrical service and distribution | Projector electrical service and added room power |
| Processing | Video processors, scaling, and signal distribution | Scaling and signal distribution; add blending only for multi-projector setups |
| Display surface | Panel area and additional display surfaces | Screen material, frames, and room-matched specialty lenses |
| Light control | Required lighting adjustments | Required blackout, masking, window coverings, and lighting changes |
| Content changes | Pixel mapping and content testing | Aspect-ratio changes, scaling checks, and content testing |
| Contingency | Priced backup equipment and scope-change allowance | Priced backup equipment and scope-change allowance |
Request Quotes for the Same Scope
Give each vendor the same written scope, covering display area, event duration, content requirements, staffing, and rehearsal schedule. Ask for separate dollar amounts for setup, show operation, teardown, venue charges, and overtime. Have vendors identify included backup equipment so you don’t mistake it for an optional extra.
Ask what could change the bill. Each estimate should state the rental period, included labor hours, overtime rates, and exclusions. Projection’s lower equipment price won’t save money if the room needs extensive light control or extra installation work. Compare final totals only after those needs are priced.
Once the quotes cover the same scope, rank them by readability first.
Fund Readability Before Scenic Extras
For corporate general sessions, put image size, readable resolution or pixel pitch, brightness, sightline testing, qualified operators, and backup equipment ahead of scenic upgrades. Cut scenic extras before cutting readability.
A slide-led leadership meeting in a light-controlled room may get better value from projection. For a video-heavy session with live camera feeds and a brightly lit stage, LED’s brightness and visual consistency may justify the premium.
Conclusion: Use the Display Selection Checklist
Once you’ve compared image quality, venue limits, and total cost, use this checklist to choose your display.
Favor LED when ambient light is hard to control or you need a bright stage backdrop. Consider projection when the room stays dark, the throw distance works, and the content centers on slides. Confirm either choice with a venue assessment and content test.
Check the Room, Content, and Budget
Before approving the display, confirm:
- Light and readability: Test your actual slides and charts from rear and side seats under show lighting.
- Viewing and cameras: Check the closest and farthest seats, plus camera positions, against LED pixel pitch or projected-image size.
- Placement and infrastructure: Verify throw distance, lens clearance, rear-screen space, power, approved rigging or floor support, cable paths, and load-in access.
- Content and rehearsal: Run slides, video, and IMAG through the final system. Get signoff on rehearsal and backup plans.
- Budget and schedule: Confirm labor, transportation, overtime, and contingency costs. Allow time for load-in, installation, alignment, testing, and strike.
Document Your Plan With Corporate Optics
Turn your checklist results into a technical brief the team can build from.
Use Corporate Optics for venue assessment, AV design, installation coordination, show operation, and contingency planning. Request a brief that records the selected display specifications, content resolutions, and aspect ratios.
Approve the display only after testing content under the least favorable seating conditions. If room conditions vary, base your decision on the seat with the poorest view - not the best one.
FAQs
How do I size a display for my audience?
Start with your venue’s dimensions, seating layout, and the distance between the screen and the farthest attendee. In large venues, image magnification (IMAG) helps keep attendees engaged, even when they’re seated far from the stage.
For LED walls, use the 10x rule to estimate the minimum viewing distance in feet: multiply the pixel pitch in millimeters by 10. Ask your production partner for 3D stage renderings to check sightlines and screen readability from different seats.
Can I combine LED and projection in one session?
Yes - pair LED walls with projection. Use LED walls for crisp, bright, vibrant main visuals, like slides, live feeds, or branding. Add projection mapping or project onto surrounding surfaces for larger effects that draw the audience into the space.
Plan the setup carefully: match brightness levels, keep audience sightlines clear, and position the projection to avoid shadows or blocked views.
How can I reduce costs without sacrificing readability?
Bring an AV partner into venue negotiations early. They can help you avoid costly in-house contracts and negotiate rates for power, rigging, and internet. Ask for 3D renderings to check sightlines and stage layouts before last-minute changes get expensive.
For large visuals, projection usually costs less in rooms where you can control the lighting. LED walls keep visuals readable in bright venues. Request an itemized quote to spot gaps in scope, hidden service charges, and equipment you don’t need.
Related Blog Posts


Streamline your workflow, achieve more

Lorem ipsum dolor sit amet, consectetur adipiscing elit. Maecenas ac velit pellentesque, feugiat justo sed, aliquet felis.



Lorem ipsum dolor sit amet, consectetur adipiscing elit. Maecenas ac velit pellentesque, feugiat justo sed, aliquet felis.